H.GREEN-COURSE HUB
  • COURSE PAGES
  • Fieldtrips/Events
  • LINKS/RESOURCES
  • STUDENT GALLERY
  • RESEARCH BLOG
  • Lab/Press Sign Up

Fishbone Fold + Diagonal Pocket Fold Envelope


Background
This  book structure was designed by Hedi Kyle (German born, taught at University of the Arts, Philadelphia) It can be altered in many ways, with more sections, or taller or longer panels. Karen Hardy is an artist who created a gorgeous book titled Drift by binding multiple fishbone folded structures together. Tia Biakaiddy (ASU alum) created a wonderful zine about homelessness using this structure (see in slideshow below).

Materials
  • One 11" x 17" sheet of paper for interior
  • One 11" x 17" sheet of paper for exterior folded envelope

Artist Examples

Diagram of Fishbone Fold
Step-by-Step Photos of Fishbone Fold

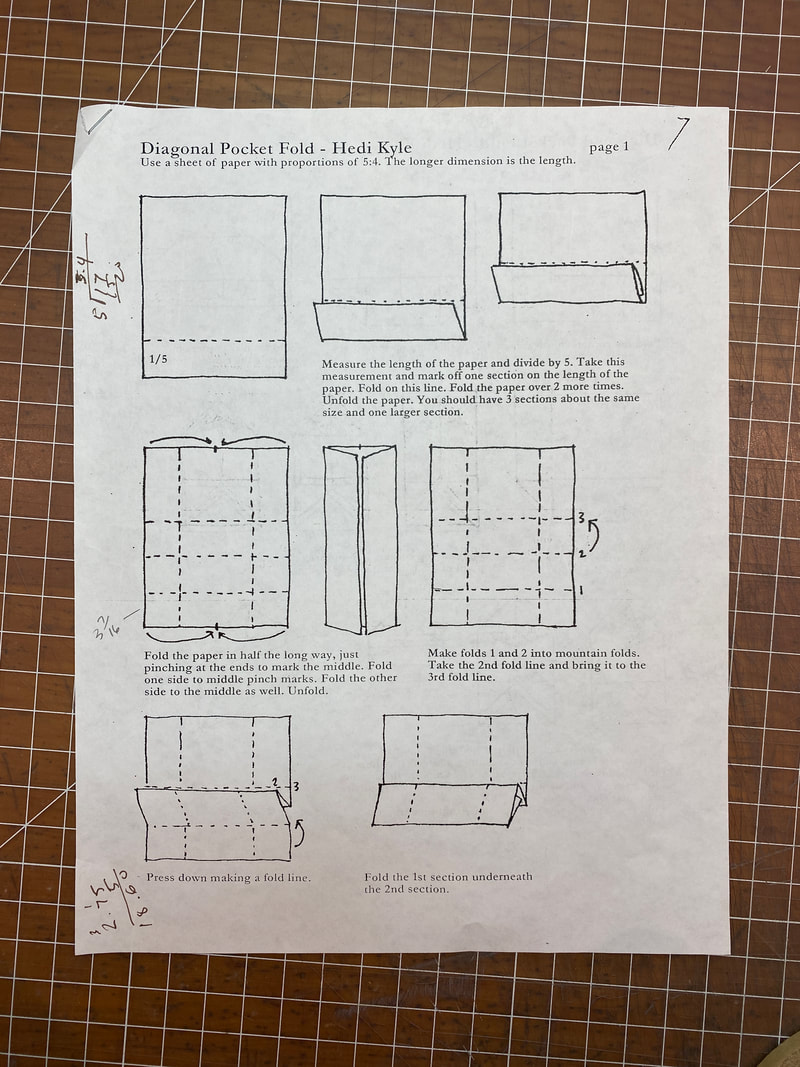
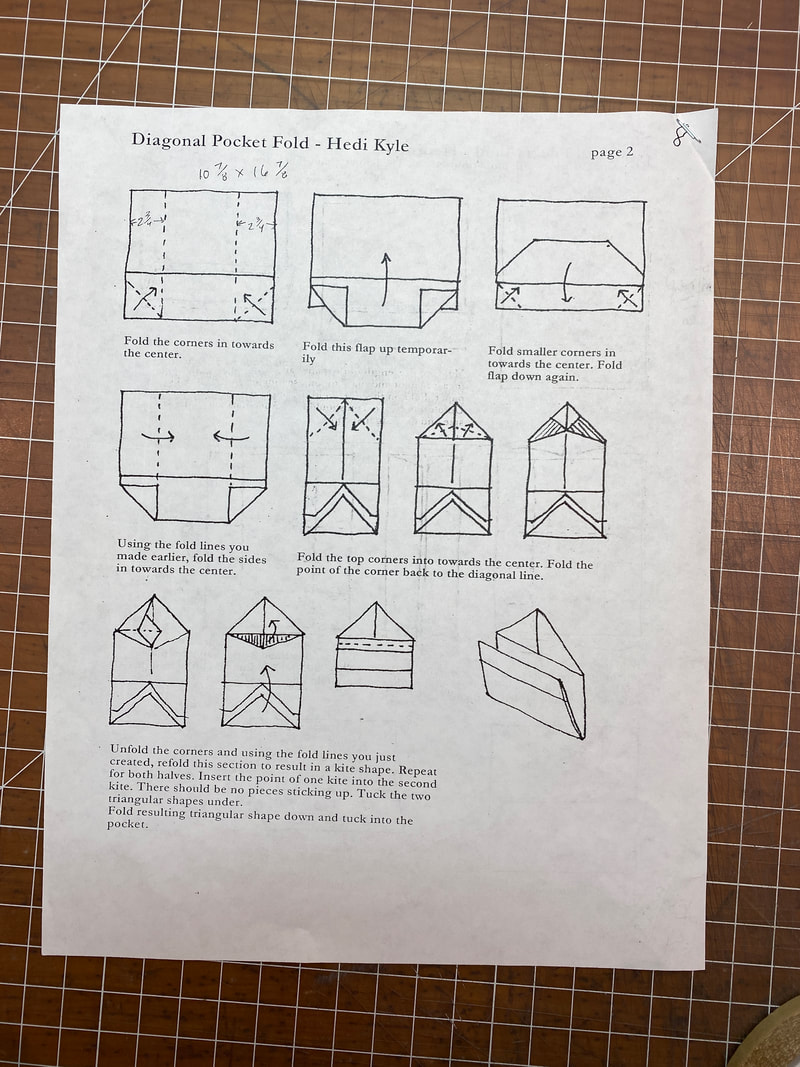
Step-by-Step Photos of Diagonal Pocket Fold Envelope
Fishbone Fold Guidelines
  • The right side of the paper should be facing up. Fold up 1 in. (2.5 cm) on the left side and 2 in. (5 cm) on the right, creating extensions, right and left.
  • Fold the remaining portion into four sections by folding the sheet in half and then in half again. These are all valley folds.
  • Open up. Starting from the right and skipping the first fold, mark 1⁄2 in. (1.5 cm) to the right of each fold, as shown.
  • Using a straight edge, score and crease from mark to mark, creating four new valley folds defining four narrow sections. All folds are valley folds.
  • Flip the sheet over toward you so that the valley folds are now mountain folds and the 2-in. (5-cm) extension is still on your right. Fold the sheet in half lengthwise and open up.
  • From the right-hand side, begin pleating by bringing the first mountain fold to the second one.
  • Skipping the 1⁄2-in. (1.5-cm) section, bring the next mountain fold to the next. You are halving the larger sections each time. Continue to pleat until the end of the sequence.
  • Open the paper up and mark the right extension and the four 1⁄2-in. (1.5-cm) sections with an X, as shown. Following the diagram, cut along the horizontal fold between the X-marked sections, being careful not to cut into the X-marked sections themselves.
  • Apply a strip of double-sided tape
    to half of the last narrow section, as shown. Bring the top half of the sheet toward you and remove the backing paper from the double-sided tape to adhere the top half to the bottom half.
  • Stand the piece up. Gently pushing in from the right extension, collapse the pages into the fishbone form.

Diagonal Pocket Fold Envelope Guidelines
  • Using an 11 x 17 sheet of paper, fold the bottom of the sheet up at 3" and 7/16ths. Then fold the paper up two more times.
  • Unfold the paper. You should have 3 sections about the same size and one larger section at the top.
  • Fold the paper in half the long way, just pinching at the ends to mark the middle. Fold one side to the middle pinch marks. Fold the other side to the middle as well. Unfold.
  • Make the two bottom folds mountain folds. Take the 2nd fold line and bring it to the 3rd fold line.
  • Press down making a fold line.
  • Fold the 1st section underneath the 2nd section.
  • Fold the corners towards the center. Fold this up temporarily, fold smaller corners in towards the center. Fold flap down again.
  • Using the fold lines you made earlier, fold the sides in towards the center.
  • Fold the top corners in towards the center. Fold the point of the corner back to the diagonal line.
  • Unfold the corners and using the fold lines you just created, refold this section to result in a kite shape. Repeat for both halves. There should be no pieces sticking up. Tuck the two triangular shapes under.
  • Fold resulting triangular shape down and tuck into the pocket.


Picture
Picture

ASU/Herberger Institute School of Art/Printmaking/Book Arts
Heather Green: heather.j.green@asu.edu
​
Office: 45B |  Office hours: T 11:00–12:00 or by appointment

  • COURSE PAGES
  • Fieldtrips/Events
  • LINKS/RESOURCES
  • STUDENT GALLERY
  • RESEARCH BLOG
  • Lab/Press Sign Up