|
By Miriam Antonieta Carpenter-Cosand Throughout the centuries booksellers, artisans and book owners have find multiple ways of embellishing these precious objects. Either by decorating the paper, the binding, or the outer unbound edge (called fore-edge). This text attempts to discuss and show different varieties of fore-edge decoration that are found on the shelves of our libraries across the globe. 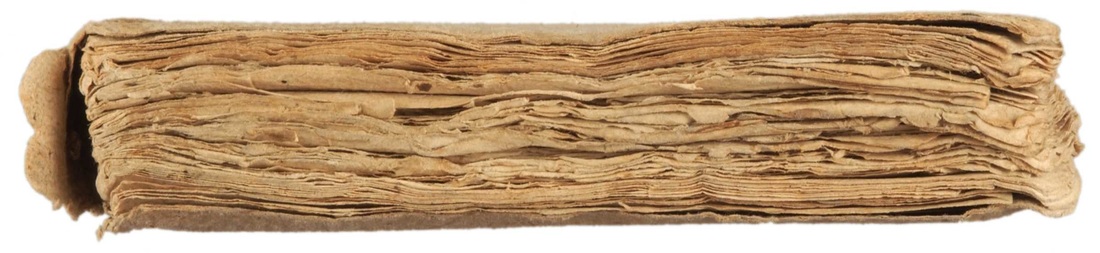 Uncut fore-edge. Butini, Jean-François, 1747-1800. Traité du luxe. Geneva: Bardin, 1774. Courtesy of Princeton University Library. Coloring Edges This is the simplest kind of edge decoration. It has been done over centuries and it was very common on devotional books. The color generally seen was any red or any shade of reds. During the last century some other colors were popular as well. All pigments are suitable for this technique. There are two ways to do these type of edges: Sprinkled and totally colored edges. For both types of edges its required to mix previously grounded pigment with paste. The book should be placed in a book lying-press. Additionally, for the totally colored edges it is good to add a couple drops of oil, vinegar and water to the mixture. Some binders would prepare the pigment with glare too. For better results and to prevent the color to run over the pages, apply it with small sponge. 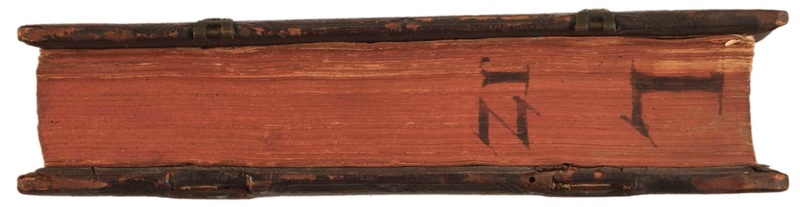 Dyed Solid. Valerius Maximus. Valerij Maximi Dictorum factorum'que memorabilium libri IX. Christophe Plantin, 1567. Courtesy of Princeton University Library. Gilding Edges Gilding in general is a very complicated process. This ornamentation and its methods are rooted in ancient Egypt. There is no a lot of history or information recorded, specifically, on the tradition gilding edges. But there is no doubt that this was very common type of ornamentation. It is also the best way to preserved book edges. There are different processes of gilding edges, the technique that it seems more comprehensible is the Rough Edge Gilding. The book must not be sewn. One should start by applying French chalk to stop the pages from sticking together. After that one should alternate the sides of the signatures to even out the pressure. Finally, we can place our book (with a board in each side to add extra support) in the lying-press. The next step is to sand. Sand in only one direction. Repeat until the edge has a high shine. In the next stage, glare will be necessary to seal our edges. For the glare we will need 2fl oz of boiling water and a ¼ teaspoon of powdered gelatin (standard gelatin from any supermarket). Add the gelatine to the boiling water and mix until thoroughly dissolved. Leave to cool slightly before use.[1] The next stage is to create a ground. What is commonly ground used is red bole. But first of all, what is Bole? Bole is a clay-mineral, this will help the gold to adhere. To mix bold you need to add some of the diluted gelatin solution. Using a natural sponge apply it until you have a smooth cover red surface. Let it dry. Now we need to prepare the gold leaf on a paper tips (300 gsm paper) to handle and move easier. Once all the pieces are ready, apply glare to the edge. Gently start lower the gold side towards the edge. And keep doing it until all the edge is covered. Let it dry and then brush the excess. To make sure the gold is stuck well take some greaseproof paper, lay it over the edge and burnish through this. Also take a Dogtooth Burnisher to burnish all the sections.[1] Then take out and put back the sections in order. And you are done! For more detail and step by step tutorial visit: http://papercutbindery.blogspot.com/2012/02/beforewe-go-ahead-and-sew-book-there-is.html 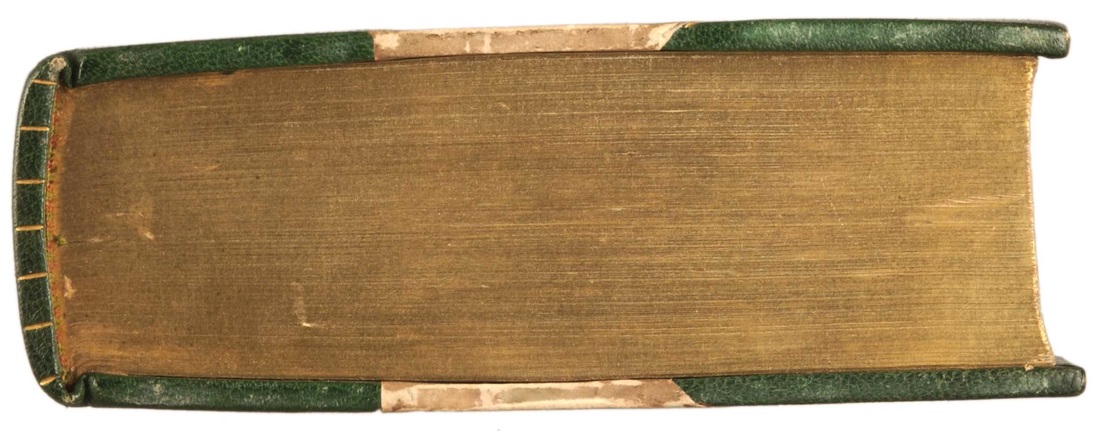 Gilt. Walton, Izaak, 1593-1683. The complete angler, or, Contemplative man's recreation. 3rd ed. London: J., F., and C. Rivington, 1775. Courtesy of Princeton University Library. Marbling Edges Marbling of book edges was introduced near the end of the 17th century to Europe. It is believed that this came through Turkey. But that it was originally developed in Japan during the 12th Century. There are many different recognizable patterns that develop during the centuries and that have a very specific process to them. Examples of the patterns can be the Small French, Blue Stormont Marble, Italian marble, Spanish marble, Nonpareil Marble and the wave marble. The process seems quite simple in the sense that the idea is to create a pattern with color on an elastic surface (carrageenan and water) and then you carefully place the edges of your book (or paper) into the wooden trough. But it requires a lot of time to prepare and design the patterns and a lot materials such as marbling combs of different sizes, a shallow wooden trough, acrylic paint (before traditionally watercolor), carrageenan, etc. For a beginner’s tutorial on how to marble edges visit: http://www.ibookbinding.com/blog/paper-marbling-turkish-marbling-tips-for-beginners/ 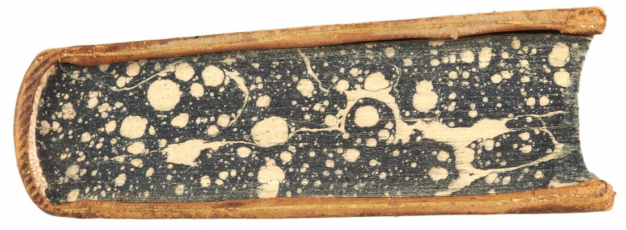 Marbeled. France. Recueil d'édits, déclarations, arrêts du Conseil. Paris: P.G. Le Mercier, 1762. Courtesy of Princeton University Library. [1] http://papercutbindery.blogspot.com/2012/02/beforewe-go-ahead-and-sew-book-there-is.html [2] Ibid. Works Cited: http://bookbinding.com/our-publications/bookbinding-for-amateurs/gilding-edges.html http://bookbinding.com/our-publications/bookbinding-for-amateurs/marblingb.html http://bookbinding.com/our-publications/bookbinding-for-amateurs/marbling.html http://libweb5.princeton.edu/visual_materials/hb/cases/edgedecoration/index.html http://www.ibookbinding.com/blog/paper-marbling-turkish-marbling-tips-for-beginners/ http://papercutbindery.blogspot.com/2012/02/beforewe-go-ahead-and-sew-book-there-is.html http://www.marbledarts.com/eng/catalog.asp?cid=31
Shannon
11/15/2016 01:40:16 pm
Thanks for the information! I don't know if I've ever noticed marbling on the edges of books before. What a beautiful way to make a book even more luxurious.
Anthony Mead
11/16/2016 06:04:23 am
Its really interesting how we have decided to adorn our objects over time. The unique quality of these books gives them character and it seems would change the way the reader would think about the contents. Its also interesting to see how they changed over the time.
Esther Hamra
11/17/2016 11:46:17 am
This reminds me of old hymnals my grandmother had in her piano bench. I always wondered how the pages got gold on the edges. I've seen a few books with paintings on the edges like The Last Supper. I think this adds something special to a book, regardless of what's written on the pages, there's a whole other story on the outside. Thanks for sharing.
Louise
11/17/2016 12:08:50 pm
The vintage video of the paper marbling is so cool! I'm literally gawking and gasping in my studio as I watch it. If you're interested in another vintage art/craft video about woodblock printed wallpaper you should watch this: https://www.youtube.com/watch?v=8ycigOdc7FU
Lena
11/17/2016 01:15:11 pm
It was interesting to read about how these processes were done- particularly the gilding process. It sounds like it would result in a really stiff and cake-y finish, but I know that it doesn't, so the amount of skill necessary to get it just right must be immense.
Jonathan Smith
11/17/2016 08:11:56 pm
This was a very informative research paper. It was interesting to see the evolution in techniques. I appreciate that you included the tutorial pages. I would like to learn this technique in the future.
Kylie Breitenfeldt
11/17/2016 08:31:17 pm
These decorations are breathtaking, and they make me want to grab a book and read for hours. That video is absolutely mesmerizing, and its interesting to see how much painstaking work can go into designing and decorating a book, I had no idea there was so much you could do with bookmaking! Comments are closed.
|